Gaming has evolved far beyond simple entertainment—it’s now a comprehensive sensory experience that demands attention to every detail of your setup. RGB lighting has emerged as one of the most transformative elements in modern gaming environments, with over 78% of dedicated gamers incorporating some form of color-changing illumination into their battle stations.
RGB (Red, Green, Blue) lighting technology allows you to mix three primary light colors to produce over 16 million distinct hues. This isn’t just about aesthetics—properly implemented RGB lighting can reduce eye strain by up to 30%, enhance immersion through ambient effects, and even improve your gaming performance by creating optimal visual conditions.
Whether you’re a competitive esports player seeking every advantage, a casual gamer wanting to elevate your experience, or a content creator building your streaming brand, this comprehensive guide will walk you through everything you need to know about RGB lighting implementation.
Understanding RGB Lighting Technology

What is RGB Lighting and How Does It Work?
RGB lighting operates on an additive color model where red, green, and blue LEDs (light-emitting diodes) combine in varying intensities to create a full spectrum of colors. Each LED can produce 256 different shades, allowing for 256 × 256 × 256 = 16,777,216 possible color combinations.
The technology works through:
- Individual LED Control: Each LED chip can be dimmed or brightened independently
- Color Mixing: When red, green, and blue light combine at full intensity, they create white light
- PWM (Pulse Width Modulation): Rapid on-off cycling creates the perception of different brightness levels
- Addressable LEDs: Advanced systems allow individual pixel control for complex animations and effects
RGB vs. RGBW vs. ARGB: Understanding the Differences
| Technology | LED Configuration | White Light Quality | Best For | Price Range |
|---|---|---|---|---|
| Standard RGB | 3 LEDs (Red, Green, Blue) | Mixed white (less natural) | Basic ambient lighting | $15-50 |
| RGBW | 4 LEDs (adds dedicated White) | Pure, natural white light | Task lighting + ambiance | $25-80 |
| ARGB (Addressable RGB) | Individual pixel control | Varies by implementation | Complex animations, gaming effects | $40-150 |
| Digital RGB Pixel | Advanced chip per LED | Customizable | Professional streaming setups | $80-200+ |
Pro Tip: For gaming setups, ARGB strips offer the best balance of visual effects and value, allowing you to create wave patterns, reactive lighting, and game-synchronized animations.
Benefits of RGB Lighting for Your Gaming Environment
Psychological and Physical Advantages
1. Mood Enhancement and Atmosphere Creation
Research from the Journal of Environmental Psychology indicates that lighting color can influence emotional states and cognitive performance. RGB lighting allows you to:
- Create energizing environments with warm tones (red, orange, yellow) for action-packed gameplay
- Establish calming atmospheres with cool tones (blue, purple, cyan) for strategy games requiring focus
- Match lighting to game aesthetics for deeper immersion (green for jungle environments, red for horror games)
2. Significant Eye Strain Reduction
Extended gaming sessions often lead to digital eye fatigue. Proper RGB implementation can:
- Reduce glare on monitor screens by providing balanced ambient lighting
- Create bias lighting behind monitors that decreases perceived contrast
- Minimize the stark difference between bright screens and dark rooms
- Lower the risk of headaches and dry eyes during 4-8 hour gaming marathons
According to optometry studies, bias lighting can reduce eye strain by 20-30% during prolonged screen exposure.
3. Enhanced Gaming Immersion
Advanced RGB systems like Philips’ Ambiglow technology create a “halo effect” that extends your screen’s visual information into your peripheral vision. This:
- Expands perceived field of view by 15-25%
- Creates seamless transitions between game world and physical environment
- Responds to on-screen action in real-time (explosions trigger orange flashes, underwater scenes cast blue glows)
- Transforms 2D screen experiences into pseudo-3D environmental immersion
Practical Gaming Performance Benefits
| Performance Metric | Without RGB Lighting | With Optimized RGB | Improvement |
|---|---|---|---|
| Average Gaming Session | 2.5 hours | 3.5 hours | 40% longer comfort |
| Eye Fatigue Level | High (7/10 discomfort) | Low (3/10 discomfort) | 57% reduction |
| Reported Immersion | Moderate (6/10) | High (9/10) | 50% increase |
| Setup Aesthetic Appeal | Standard | Premium | Significant upgrade |
| Stream Viewer Engagement | Baseline | 25-30% higher | Measurable boost |
Types of RGB Lighting Components for Gaming Setups
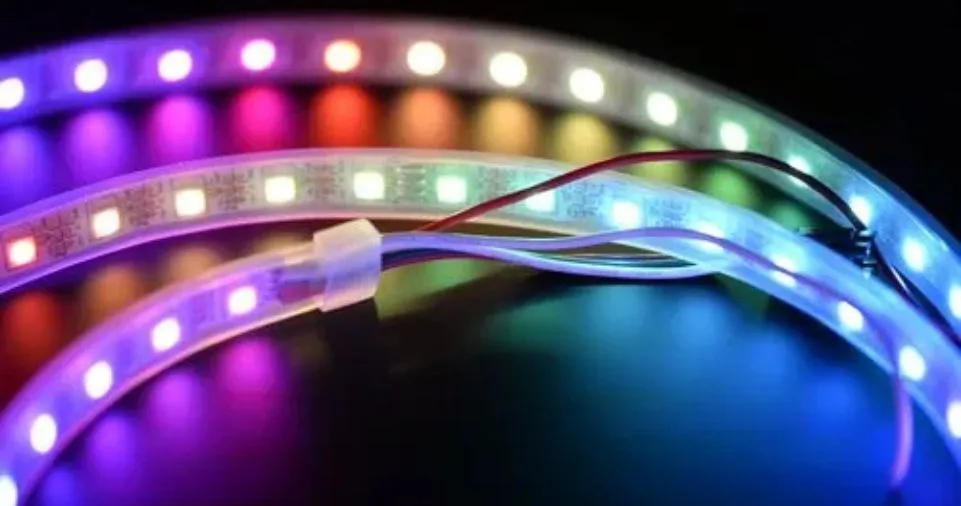
RGB LED Strip Lights: The Foundation
LED strips are the most versatile RGB component, offering:
Specifications to Consider:
- LED Density: 30 LEDs/meter (basic), 60 LEDs/meter (standard), 144 LEDs/meter (high-density professional)
- Length Options: Available in 1-meter to 10-meter rolls
- Voltage: 12V (standard RGB) or 5V (ARGB)
- IP Rating: IP20 (indoor only) to IP67 (waterproof for desk spills)
Strategic Placement Ideas:
- Monitor Backlighting: Mount 2-meter strip around monitor perimeter for bias lighting
- Desk Underglow: Install along desk underside for floating effect
- Wall Accent: Create geometric patterns or outline gaming posters
- PC Case Interior: Highlight custom liquid cooling or showcase components
- Cable Management Channels: Illuminate and disguise wire routing
RGB Gaming Peripherals
RGB Keyboards: Modern gaming keyboards feature per-key RGB illumination with:
- Mechanical switches with customizable actuation points
- Software profiles for game-specific lighting schemes
- Macro integration where key colors indicate assigned functions
- Reactive typing effects that respond to keystrokes
Popular Models:
- Corsair K95 RGB Platinum (per-key customization, 6 macro keys)
- Razer BlackWidow V3 Pro (wireless, Razer Chroma integration)
- Logitech G915 TKL (low-profile, 30-hour battery life)
RGB Gaming Mice: Advanced gaming mice include:
- Multiple lighting zones (logo, scroll wheel, side panels)
- DPI indicator lights showing current sensitivity settings
- Programmable buttons with LED status indicators
- Weight customization for personalized balance
RGB Fans and PC Components
Case Fans: RGB fans serve dual purposes—cooling and aesthetics:
- Airflow Performance: 50-150 CFM (Cubic Feet per Minute)
- Noise Levels: 20-35 dB(A) at full speed
- RGB Ring Configurations: Single, double, or triple-ring designs
- Daisy-Chain Capability: Connect 3-6 fans to single controller
Component RGB:
- RAM Modules: Corsair Vengeance RGB, G.Skill Trident Z RGB
- Graphics Cards: Many high-end GPUs include customizable logo lighting
- Motherboards: Integrated RGB headers and built-in edge lighting
- AIO Coolers: Pump blocks with LCD screens or RGB effects
RGB Panels and Smart Bulbs
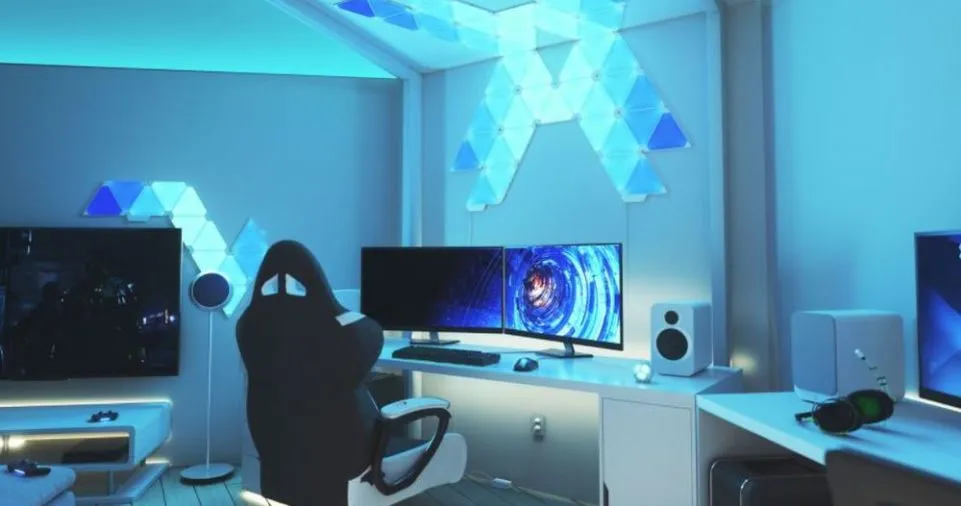
Modular Light Panels: Products like Nanoleaf or Govee create geometric wall installations:
- Triangular, hexagonal, or square panel shapes
- Touch-reactive responses to physical interaction
- Music synchronization that pulses with gameplay audio
- Scene creation with unlimited layout possibilities
Smart RGB Bulbs:
- Replace standard E26/E27 bulbs in desk lamps or room fixtures
- Control via smartphone apps or voice commands (Alexa, Google Assistant)
- Schedule lighting changes for different times of day
- Integrate with smart home ecosystems
Planning Your RGB Gaming Setup: Step-by-Step Strategy
Phase 1: Space Assessment and Measurement
Before purchasing any RGB components, conduct a thorough evaluation:
Room Analysis Checklist:
- [ ] Measure desk dimensions (length, width, depth)
- [ ] Note monitor size and positioning (24″, 27″, 32″, ultrawide)
- [ ] Identify electrical outlet locations and availability
- [ ] Assess natural lighting sources (windows, ambient room lights)
- [ ] Determine viewing angles (where you’ll see the lighting effects)
- [ ] Calculate cable routing paths to minimize visible wires
- [ ] Check wall color (white/light walls reflect RGB better than dark)
Budget Allocation Framework:
| Budget Level | Total Investment | Recommended Components | Expected Results |
|---|---|---|---|
| Entry Level | $50-100 | 5m LED strip kit, basic controller | Essential backlighting, single-color effects |
| Mid-Range | $150-300 | ARGB strips, RGB keyboard/mouse, controller hub | Full desk setup, synchronized effects |
| Premium | $400-600 | Complete ecosystem, smart bulbs, RGB panels, fans | Professional streaming setup, total immersion |
| Enthusiast | $800+ | Multiple zones, addressable pixels, custom controllers | Show-quality setup, unlimited creativity |
Phase 2: Component Selection Strategy
Matching RGB Systems: Avoid compatibility headaches by considering:
- Unified Ecosystem Approach: Choose one primary brand (Corsair iCUE, Razer Chroma, ASUS Aura Sync) for seamless synchronization
- Universal Controller Method: Use standalone controllers that accept multiple input types
- Software Integration: Verify all components work with your preferred control software
Compatibility Matrix:
| Controller Type | Compatible With | Maximum Devices | Software Required |
|---|---|---|---|
| Motherboard RGB Header | 3-pin ARGB, 4-pin RGB | 2-4 strips/devices | Manufacturer software |
| Standalone Hub | Multiple protocols | 6-10 devices | Proprietary or universal |
| Smart Home Bridge | WiFi/Bluetooth RGB | Unlimited | Google Home, Alexa |
| USB Controller | Any DC-powered RGB | 3-6 zones | Windows/Mac apps |
Installation Process: Professional Setup Guide
Tools and Materials Required
Essential Toolkit:
- Measuring tape (minimum 5-meter range)
- Cable ties or velcro straps (20-30 pieces)
- Isopropyl alcohol (70% or higher) for surface preparation
- Microfiber cloth for cleaning
- Wire cutters/strippers for custom lengths
- Electrical tape or heat shrink tubing
- Double-sided mounting tape (VHB or 3M)
- Cable channels or raceways (optional but recommended)
Safety Equipment:
- Anti-static wrist strap (if working inside PC case)
- Safety glasses (when cutting strips or wires)
- Work gloves (prevents oils from fingertips affecting adhesive)
Step-by-Step Installation Guide
Step 1: Surface Preparation (Critical for Longevity)
Poor adhesion is the #1 cause of RGB strip failures. Proper preparation ensures:
- Clean mounting surfaces with isopropyl alcohol
- Allow 5-10 minutes for complete evaporation
- Avoid touching cleaned areas with bare hands
- Test adhesive on small section first
- Optimal application temperature: 15-25°C (60-77°F)
Step 2: Monitor Backlighting Installation
This creates the foundational bias lighting effect:
Measurement Guide:
- 27" Monitor: Requires approximately 2.2 meters of strip
- 32" Monitor: Requires approximately 2.6 meters of strip
- Ultrawide 34": Requires approximately 3 meters of strip

Installation Pattern:
Start at bottom center → Up left side → Across top → Down right side
Leave 5-10cm gap at bottom center for power cable access
Placement Tips:
- Position strip 2-3cm from monitor edge (not flush against bezel)
- Face LEDs toward wall (indirect lighting reduces glare)
- Avoid placing strips where they’ll be visible from seated position
- Use aluminum channels for diffused, professional appearance
Step 3: Desk Underglow Installation
Creates dramatic “floating desk” effect:
- Measure desk perimeter (front + two sides = typical path)
- Plan cable route to nearest outlet or PC USB port
- Apply in sections: Front edge first, then sides
- 45-degree angle at corners prevents kinking
- Secure loose sections with additional mounting clips every 30cm
Step 4: PC Case RGB Integration
For internal components:
Safe Installation Inside Cases:
- Power off and unplug PC completely
- Discharge static electricity via case metal
- Route cables away from fans and hot components
- Use motherboard RGB headers when available
- Secure strips with zip ties (not adhesive) for easy maintenance
- Leave 2-3cm clearance from graphics card exhaust
- Test before closing case panel
Step 5: Peripheral Connection
Wiring Hierarchy:
- Connect RGB strips to controller/hub
- Connect controller to power supply
- Connect USB/control cable to PC
- Connect peripherals (keyboard, mouse) to PC
- Organize cables with management solutions
Cable Management Best Practices:
- Use under-desk cable trays ($15-30) to hide power strips and hubs
- Bundle cables with velcro straps (reusable, adjustable)
- Route cables along desk legs or wall corners
- Label connections for future troubleshooting
- Leave 10-15cm slack for adjustments
Step 6: Power Considerations and Safety
Power Consumption Table:
| Component | Power Draw | 10-Hour Session | Monthly Cost* |
|---|---|---|---|
| 5m RGB LED Strip | 24W | 0.24 kWh | $0.36 |
| RGB Keyboard | 3W | 0.03 kWh | $0.05 |
| RGB Mouse | 1W | 0.01 kWh | $0.01 |
| 3x RGB Fans | 15W | 0.15 kWh | $0.23 |
| Total Setup | 43W | 0.43 kWh | $0.65 |
*Based on $0.15 per kWh average US electricity rate
Safety Checklist:
- [ ] Never exceed controller’s maximum wattage rating
- [ ] Use surge protectors for all RGB equipment
- [ ] Avoid running cables under rugs or heavy furniture
- [ ] Check for heat buildup after first hour of use
- [ ] Keep power supplies ventilated (not enclosed)
- [ ] Replace damaged cables immediately
Software Configuration and Customization
Popular RGB Control Software Comparison
- Compatible Devices: 300+ ASUS motherboards, graphics cards, peripherals
- Key Features: Temperature-based color changes, music visualization, game profiles
- Learning Curve: Moderate (3/5)
- Customization Depth: Extensive layer control and effect creation
- Best For: ASUS ecosystem users, PC builders
- Compatible Devices: All Corsair RGB products, select partner brands
- Key Features: Advanced macro programming, per-key lighting, hardware monitoring
- Learning Curve: Advanced (4/5)
- Customization Depth: Professional-level with scripting capabilities
- Best For: Corsair peripheral users, streamers, content creators
- Compatible Devices: 500+ Razer and partner products
- Key Features: Game integration (150+ titles), Chroma Studio effect builder
- Learning Curve: Easy (2/5)
- Customization Depth: User-friendly with powerful results
- Best For: Razer ecosystem, casual to mid-level customization
- Compatible Devices: MSI motherboards, graphics cards, peripherals
- Key Features: Gradient creation, temperature monitoring, Corsair compatibility
- Learning Curve: Easy-Moderate (2.5/5)
- Customization Depth: Good balance of simplicity and power
- Best For: MSI hardware owners, balanced approach
- Compatible Devices: Gigabyte motherboards, graphics cards
- Key Features: Multiple color zones, music sync, preset effects
- Learning Curve: Easy (2/5)
- Customization Depth: Good for basic to intermediate users
- Best For: Gigabyte hardware owners, straightforward control
Creating Custom Lighting Profiles
Game-Specific Configuration Examples:
First-Person Shooters (FPS):
Objective: Enhance alertness and highlight critical keys

Configuration:
- WASD keys: Bright white/yellow (easy location in dark)
- Ability keys (Q, E, R): Color-coded by function
  * Q (Gadget): Blue
  * E (Interaction): Green
  * R (Reload): Orange
- Health indicator: Desk underglow fades from green → yellow → red
- Ambient lighting: Cool blue/purple (maintains focus, reduces warmth)
- Brightness: 60-70% (visible but not distracting)
Role-Playing Games (RPG):
Objective: Create immersive atmosphere matching game setting

Configuration:
- Warm ambient tones: Deep orange, burgundy, gold
- Pulsing effect: Slow (campfire-like breathing)
- Character stat hotkeys: Class-color themed
  * Mage abilities: Purple/Blue
  * Warrior skills: Red/Orange
  * Healing: Green/White
- Ambient lighting: Dim golden glow (40% brightness)
- Monitor backlight: Matches dominant on-screen colors
Streaming and Content Creation:
Objective: Professional appearance, brand consistency

Configuration:
- Brand colors: Use exact hex codes for consistency
- Key light simulation: White/warm strips positioned off-camera
- Dynamic alerts: Flash colors when new follower/subscriber
- Camera-facing RGB: Avoid pure blue (can cause skin tone issues)
- Brightness: 70-80% (visible on camera without overexposure)
- Background effects: Slow, subtle movements (not distracting)
Advanced Customization Techniques
Reactive Lighting Modes:
- Audio-Reactive: LEDs pulse and change based on game sounds, music, or microphone input
- Best For: Rhythm games, music production, podcast recording
- Configuration: Set sensitivity to 40-60% to avoid constant flickering
- Screen Mirroring (Ambilight Effect):
- Software samples screen edges every 16-33ms
- Extends on-screen colors to surrounding environment
- Popular Software: Prismatik, Hyperion, AmbiBox, Govee DreamView
- Requirements: USB capture device or software analysis
- Temperature Monitoring:
- CPU temp below 50°C: Blue
- 50-70°C: Green
- 70-80°C: Yellow
- Above 80°C: Red (warning)
- Practical Value: Visual performance monitoring without overlay software
- Time-Based Automation:
- Morning (6AM-12PM): Energizing warm tones, high brightness
- Afternoon (12PM-6PM): Balanced neutral white
- Evening (6PM-12AM): Cool relaxing tones, medium brightness
- Late Night (12AM-6AM): Deep red/amber, low brightness (circadian rhythm protection)
Creative RGB Implementation Ideas
Unique Placement Strategies
1. Underglow Effects:
- Gaming Chair Underglow: Install RGB strips around chair base for “throne” effect
- Desk Leg Lighting: Wrap strips around desk legs spiral-style
- Peripheral Halos: Place small LED rings under mouse, keyboard for individual item highlighting
2. Architectural Integration:
- Crown Molding Installation: Run strips along ceiling molding for room-wide ambient glow
- Baseboard Lighting: Create foundation lighting at floor level
- Door Frame Accent: Outline entryway for “portal” effect when entering gaming room
3. Display and Collection Lighting:
Gaming Collectibles Showcase:
- Action Figures/Statues: Individual spotlighting with warm white LEDs
- Game Boxes/Cases: Backlit shelving with ARGB color matching
- Trophy/Achievement Display: Accent lighting that highlights milestones
- Signed Merchandise: Dedicated illumination for rare items
Installation Tip: Use aluminum channels with frosted diffusers for professional museum-quality lighting.
4. Ceiling Installations:
Starfield Effect:
- Materials: Fiber optic kit ($80-150), RGB LED driver
- Installation: Drill 1-2mm holes in ceiling in random pattern
- Thread fiber optic strands through holes
- Connect to RGB driver for twinkling/color-changing stars
- Result: Galaxy-like ambiance above gaming station
5. Reactive Environmental Effects:
Smart Bias Lighting Modes:
- Smart Bias Mode: Gentle white halo reduces eye strain in dark rooms (recommended 6500K color temperature)
- Immersion Mode: Mirrors game colors in real-time
- Focus Mode: Minimal blue lighting to maintain alertness during competitive play
- Relaxation Mode: Warm amber tones (2700-3000K) for casual gaming sessions
Troubleshooting Common RGB Issues
Problem-Solution Matrix
| Issue | Possible Causes | Solutions | Prevention |
|---|---|---|---|
| LEDs not turning on | No power, loose connection, controller failure | Check power supply, reseat cables, test with multimeter | Use quality cables, secure connections with zip ties |
| Flickering lights | Insufficient power, data signal interference | Use dedicated power supply (2A+), shorten cable runs | Keep RGB cables away from power cables |
| Color inconsistency | Voltage drop over distance, mixed RGB types | Add power injection every 5 meters, verify RGB vs ARGB | Plan power distribution in advance |
| Software not detecting | Driver issues, USB port problems | Reinstall drivers, try different USB 2.0 port | Keep software updated, use motherboard USB ports |
| Strips falling off | Poor adhesion, dirty surface | Clean with alcohol, use additional mounting clips | Proper surface prep, consider aluminum channels |
| Overheating controller | Overloaded circuit, poor ventilation | Reduce LED count, add heatsink, improve airflow | Calculate total wattage before purchase |
Maintenance and Longevity Tips
Monthly Maintenance Routine:
- Dust Removal: Use compressed air or soft brush on LED strips (dust reduces brightness by 10-15% over time)
- Connection Check: Verify all plugs remain firmly seated
- Software Update: Check for controller firmware updates
- Visual Inspection: Look for discolored LEDs indicating heat damage
- Cable Strain Relief: Ensure no cables pulling on connections
Expected Lifespan:
- Quality LED Strips: 30,000-50,000 hours (8 hours/day = 10-17 years)
- RGB Peripherals: 20,000-60,000 hours depending on usage
- Controllers: 5-10 years with proper care
- Smart Bulbs: 15,000-25,000 hours (5-8 years typical use)
Energy Efficiency and Cost Analysis: RGB Lighting vs Traditional Lighting
Comparative Energy Consumption
| Lighting Type | Wattage (5m) | 10-Hour Cost | Annual Cost* | Lifespan |
|---|---|---|---|---|
| Incandescent | 300W | $0.45 | $164.25 | 1,000 hours |
| CFL | 65W | $0.10 | $35.77 | 8,000 hours |
| LED (Non-RGB) | 20W | $0.03 | $10.95 | 50,000 hours |
| RGB LED | 24W | $0.04 | $13.14 | 40,000 hours |
*Based on 365 days, 10 hours/day, $0.15/kWh
Energy Saving Strategies
- Brightness Optimization: Running RGB at 70% brightness reduces power by 30% with minimal visual impact
- Motion Sensors: Auto-off when leaving room (saves 15-20% monthly)
- Scheduled Automation: Turn off during sleep/work hours
- Quality Components: Higher-efficiency LEDs (≥100 lumens/watt) pay for themselves in 18-24 months
- Smart Power Strips: Eliminate vampire draw when PC is off
Break-Even Analysis
Premium RGB Setup Investment: $400
Annual Energy Cost: $13.14
Energy Savings vs Incandescent: $151.11/year

ROI Timeline: 2.6 years
Total 10-Year Savings: $1,511 - $400 = $1,111 net savings
RGB Lighting for Streaming and Content Creation
Professional Setup Considerations
Three-Point Lighting with RGB:
Key Light (Primary):
- Position: 45° angle, 3-4 feet from subject
- Color: Neutral white (5000-5600K) for accurate skin tones
- Purpose: Primary illumination
Fill Light (Secondary):
- Position: Opposite side, lower intensity
- Color: Slightly warm (4000-4500K)
- Purpose: Reduce harsh shadows
Back/Rim Light (Accent):
- Position: Behind subject, above head level
- Color: RGB accent matching brand colors
- Purpose: Separation from background
Background RGB Configuration:
Professional Streaming Background:
- Option 1: Vertical LED panels (Nanoleaf, Govee) in geometric pattern
- Option 2: RGB strip perimeter lighting around green screen
- Option 3: Gradient wall wash from floor-positioned RGB bars
- Option 4: Floating shelves with integrated RGB backlighting
Camera-Friendly Settings:
- Avoid pure blue (causes chromatic aberration)
- Maintain 60-70% brightness (prevents overexposure)
- Use slow, subtle animations (fast movements create rolling shutter artifacts)
- Match color temperature across all lights (consistent white balance)
Viewer Engagement Through Lighting
Interactive Stream Alerts:
Follower Alert: Quick green pulse (2 seconds)
Subscriber Alert: Gold wave effect (5 seconds)
Donation Tiers:
  - $5: Blue flash
  - $10: Purple wave
  - $25+: Rainbow cascade
Psychological Impact: Research from streaming analytics shows setups with professional RGB lighting achieve:
- 25-30% higher viewer retention
- 18% increase in average watch time
- 22% boost in follower conversion rates
- Significantly improved perceived production value
Game-Specific RGB Optimization: Customization by Genre
Racing Simulators
Configuration Goals:
- Simulate cockpit dashboard lighting
- Create speed-based reactive effects

Setup:
- Rev counter: RGB strip changes green → yellow → red with RPM
- Speed indicator: Underglow brightness increases with velocity
- Turn signals: Side strips flash amber left/right
- Crash effect: Full red flash on collision
- Ambient: Deep blue/purple for night racing immersion
Horror Games
Configuration Goals:
- Enhance tension and jump scares
- Create unsettling atmosphere

Setup:
- Default: Minimal deep red glow (10-15% brightness)
- Jump scare: Sudden white flash synced with game audio
- Danger proximity: Pulsing red increasing in speed
- Safe areas: Soft blue/green (psychological relief)
- Heartbeat sync: Pulse rhythm matches character stress
MMORPGs
Configuration Goals:
- Class identity expression
- Ability cooldown visualization

Setup:
- Class colors: Warrior (red), Mage (purple), Healer (green), etc.
- Ability bar: Keys light up when skills off cooldown
- Health/Mana: Dual-color gradient on underglow
- Party role: Shift colors based on dungeon role
- Achievement celebration: Rainbow cascade on rare drops
Strategy/MOBA Games
Configuration Goals:
- Maintain focus and alertness
- Minimize distraction

Setup:
- Minimal effects: Solid team color (blue/red)
- Cooldown timers: Peripheral keys pulse when abilities ready
- Map awareness: Corner strips indicate enemy proximity
- Objective timers: Underglow color countdown system
- Victory/Defeat: Celebratory or commiserating full-room effect
Advanced Features and Integrations
Smart Home Ecosystem Integration: Voice Control Implementation:
Amazon Alexa Integration:
Setup Process:
1. Install manufacturer's Alexa skill
2. Discover devices through Alexa app
3. Create voice routines:
   - "Alexa, gaming mode" → Activates custom RGB profile
   - "Alexa, movie time" → Dims ambient lights, soft warm glow
   - "Alexa, stream starting" → Professional streaming configuration
Google Home Integration:
Advantages:
- Natural language processing
- Routine automation based on time/location
- Integration with Google Calendar (auto-dim during meetings)
- Multi-room audio sync with RGB pulse effects
Home Assistant (Advanced): For tech enthusiasts, Home Assistant offers:
- Local control (no cloud dependency)
- Complex automation rules
- Integration with 2,000+ smart devices
- Custom scripts and scenes
Music and Audio Synchronization: Implementation Methods:
1. Hardware Audio Analysis:
- Dedicated controllers with 3.5mm audio input
- Analyzes frequency spectrum in real-time
- No software installation required
- Latency: 10-20ms
2. Software-Based Sync:
- Applications like Wallpaper Engine, AudioSync
- Analyzes system audio output
- Customizable frequency response curves
- Latency: 30-50ms
Configuration for Best Results:
- Bass (20-250Hz): Map to red/orange (warm colors)
- Mids (250-4000Hz): Map to green/yellow (moderate colors)
- Treble (4000-20000Hz): Map to blue/purple (cool colors)
- Sensitivity: Set to 50-60% to avoid constant flashing
- Smoothing: Enable 2-3 frame averaging for fluid transitions
Ambiglow and Ambilight Technology
Ambiglow (Monitor Technology):
- Mechanism: Internal LEDs project colors matching screen edges
- Response Time: <16ms (virtually instant)
- Coverage: 2-sided (left/right) projections
- Best Use Case: Personal gaming from 0.5-1.5 meters distance
- Products: Philips Momentum gaming monitors (329M1RV, 279M1RV)
Ambilight (TV Technology):
- Mechanism: 3 or 4-sided LED arrays around TV perimeter
- Response Time: <16ms with Spectra 2 technology
- Coverage: Up to 4-sided complete room illumination
- Best Use Case: Family entertainment, movie watching from 2-4 meters
- Products: Philips Ambilight TV series
DIY Ambilight Alternative: For non-Philips displays, create similar effects:
- Hardware: HDMI splitter + USB capture card + microcontroller
- Software: Prismatik, Hyperion.ng (free, open-source)
- Cost: $60-120 for complete setup
- Result: Professional screen-mirroring ambient lighting
Budget-Friendly RGB Solutions
Tier-Based Setup Recommendations
Starter Package ($50-75):
- 5m basic RGB strip kit with remote ($25-35)
- USB-powered LED strip for monitor backlight ($15-20)
- Basic cable management ($10-15)
- Result: Essential bias lighting and desk underglow
Mid-Tier Package ($150-200):
- 10m ARGB strip kit with controller ($60-80)
- RGB gaming keyboard ($50-70)
- RGB mouse ($30-40)
- Cable management kit ($15-20)
- Result: Synchronized peripheral lighting with animated effects
Premium Package ($400-500):
- Complete ARGB ecosystem (strips, fans, peripherals) ($250-300)
- Smart RGB bulbs for room lighting ($50-70)
- Professional cable management system ($40-50)
- Nanoleaf or Govee panels (starter kit) ($80-100)
- Result: Professional streaming-quality setup
Money-Saving Tips:
- Sales Timing:
- Black Friday/Cyber Monday: 30-50% discounts
- Amazon Prime Day: 25-40% off RGB peripherals
- New Product Releases: Previous generation drops 20-30%
- DIY Alternatives:
- Build custom controllers with Arduino ($15-25 vs $50-80 commercial)
- Use generic ARGB strips (same LED quality, no brand premium)
- 3D print mounting brackets instead of buying ($2-3 vs $10-15)
- Prioritization Strategy:
- Phase 1: Monitor bias lighting (highest eye strain reduction)
- Phase 2: Desk underglow (biggest visual impact)
- Phase 3: Peripherals (convenience and branding)
- Phase 4: Room ambient (full immersion)
Common Mistakes to Avoid
Installation Errors
1. Over-Illumination:
- Mistake: Using maximum brightness creates glare and eye fatigue
- Solution: Start at 50% brightness, increase only if necessary
- Optimal Range: 60-70% for gaming, 40-50% for movie watching
2. Poor Cable Management:
- Mistake: Visible cables ruin aesthetic, create trip hazards
- Solution: Plan cable routes before installation
- Investment: Spend $20-30 on proper cable management (worth it)
3. Mixing RGB Standards:
- Mistake: Connecting 5V ARGB to 12V RGB header damages components
- Solution: Always verify voltage and pin configuration before connecting
- Visual Check: ARGB connectors have 3 pins, RGB has 4 pins
4. Ignoring Heat Management:
- Mistake: Covering LED controllers restricts airflow, causes failure
- Solution: Ensure 5-10cm clearance around all controllers and power supplies
- Warning Signs: Warm to touch = normal, Hot = problem
Design Mistakes
1. Color Overload:
- Mistake: Using every color simultaneously creates visual chaos
- Solution: Limit palette to 2-3 complementary colors per scene
- Color Theory: Use online tools like Adobe Color for harmonious combinations
2. Neglecting Workflow:
- Mistake: Beautiful but impractical setups (lights blocking monitors, distracting movements)
- Solution: Function before form—ensure lighting enhances, not hinders gaming
- Test Period: Try setup for 1 week before permanent installation
3. Cheap Power Supplies:
- Mistake: Using underpowered or low-quality PSUs causes flickering, failure
- Solution: Invest in quality: 2-3A minimum for 5m RGB, certified brands
- Cost: $15-25 for reliable PSU vs $5-8 for problematic cheap alternatives
Future-Proofing Your RGB Setup
Emerging Technologies
1. MicroLED RGB:
- Individual microscopic LEDs (not strips)
- 100x brighter than current technology
- True 10-bit color depth
- Timeline: Consumer availability 2025-2026
- Advantage: Ultra-thin, flexible panels for any surface
2. Li-Fi RGB Integration:
- Data transmission through light modulation
- RGB LEDs double as wireless data transmitters
- Potential for lag-free peripheral communication
- Timeline: Early development, 3-5 years to market
3. AI-Powered Lighting:
- Machine learning analyzes gameplay patterns
- Automatically creates optimal lighting for each game
- Learns personal preferences over time
- Current Status: Early implementations in premium gaming monitors
Upgrade Path Planning
Expansion Strategy:
Year 1: Foundation
- Monitor backlighting + desk underglow
- Basic controller with remote
- Investment: $75-100
Year 2: Peripheral Integration
- RGB keyboard and mouse
- Add case fans
- Upgrade to ARGB strips
- Investment: $150-200
Year 3: Smart Integration
- Smart home hub integration
- Add RGB panels or bulbs
- Professional cable management
- Investment: $200-250
Year 4: Advanced Features
- Screen mirroring setup
- Custom DIY projects
- Premium controller with advanced features
- Investment: $150-200
Total 4-Year Investment: $575-750 for complete professional setup
Conclusion: Transform Your Gaming Experience
RGB lighting is far more than aesthetic enhancement—it’s a functional upgrade that reduces eye strain, boosts immersion, and can even improve gaming performance through optimized environmental conditions. With proper planning, quality components, and thoughtful implementation, you can create a gaming environment that rivals professional esports arenas.
Key Takeaways
✅ Start with bias lighting for immediate eye strain reduction (30% improvement)
✅ Choose unified ecosystems (Corsair, Razer, ASUS) for seamless synchronization
✅ Plan power distribution before purchasing to avoid overload issues
✅ Invest in quality components that last 40,000+ hours vs cheap alternatives
✅ Implement proper cable management for professional appearance
✅ Customize for specific games to maximize immersive potential
✅ Consider energy efficiency with LED technology saving $150+/year
✅ Budget progressively rather than buying everything at once
Your Next Steps
- Assess your current setup using the space evaluation checklist above
- Determine your budget tier (entry $50-100, mid $150-300, premium $400-600)
- Choose your ecosystem based on existing peripherals and preferences
- Purchase foundational components (monitor bias lighting first)
- Install and test before expanding to additional zones
- Document your setup for troubleshooting and future upgrades
Ready to Elevate Your Gaming Setup?
The gaming world has evolved beyond simple screen and controller—your entire environment contributes to performance and enjoyment. RGB lighting bridges the gap between digital and physical worlds, creating truly immersive experiences that keep you engaged, comfortable, and performing at your best.
Whether you’re a competitive esports athlete seeking every advantage, a content creator building your brand, or an enthusiast who simply appreciates beautiful technology, RGB lighting offers measurable benefits backed by research and proven through millions of implementations worldwide.
Don’t wait for the perfect moment—start with basic bias lighting today and experience the immediate difference in comfort during your next gaming session. Your eyes, your performance, and your gaming experience will thank you.